Main-track train derailment
Canadian Pacific Railway
Freight Train CP 803-111
Mile 97.4, Canadian National Ashcroft Subdivision
Lytton, British Columbia
The Transportation Safety Board of Canada (TSB) investigated this occurrence for the purpose of advancing transportation safety. It is not the function of the Board to assign fault or determine civil or criminal liability. This report is not created for use in the context of legal, disciplinary or other proceedings. See Ownership and use of content. Masculine pronouns and position titles may be used to signify all genders to comply with the Canadian Transportation Accident Investigation and Safety Board Act (S.C. 1989, c. 3).
Summary
At approximately 2207 Pacific daylight time on 31 July 2006, Canadian Pacific Railway freight train 803-111, proceeding westward from Kamloops to Vancouver, British Columbia, derailed 20 loaded coal cars while travelling across the bridge over the Thompson River at Mile 97.4 of Canadian National's Ashcroft Subdivision near Lytton, British Columbia. The derailment resulted in extensive damage to the track and bridge. Twelve cars fell off the bridge, spilling approximately 1400 tons of coal into the river. There were no injuries and there was minimal environmental damage.
Ce rapport est également disponible en français.
Factual information
The accident
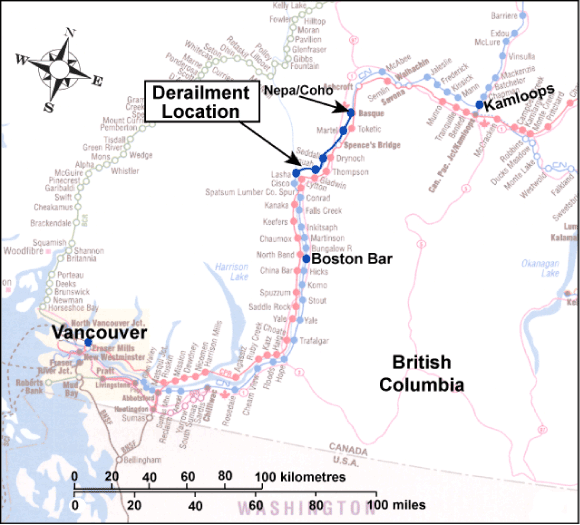
On 31 July 2006, at approximately 1715 Pacific daylight time,Footnote 1 Canadian Pacific Railway (CPR) freight train 803-111 (the train) departed Kamloops, British Columbia, travelling westward to Vancouver, British Columbia, over CPR's Thompson Subdivision (see Figure 1). At Nepa, Mile 54.8, the train crossed over to Mile 57.2 of Canadian National's (CN) Ashcroft Subdivision. The Ashcroft Subdivision consists of a single main track that extends from Kamloops, Mile 0.0, to Boston Bar, British Columbia, Mile 125.5. Train movements on the Ashcroft Subdivision are governed by the Centralized Traffic Control System in accordance with the Canadian Rail Operating Rules and supervised by a rail traffic controller located in Edmonton, Alberta.
The train was approximately 6930 feet in length, weighed 17 400 tons, and was powered by two locomotives: CP 9830 in the lead and CP 9810 at the tail end of the train. The train consisted of 124 loaded coal hopper cars. The crew consisted of a locomotive engineer and a conductor. Both crew members were familiar with the territory, were qualified for their positions, and met fitness and rest standards.
The train was proceeding on a clear signal indication leaving Morris, British Columbia, Mile 89.5, and approached the bridge over the Thompson River at Mile 97.4 on the eight-degree left-hand curve at a speed of 23.5 mph. The locomotives were in throttle position 2 and the brakes were released. The crew did not notice anything unusual as the lead locomotive passed over the bridge. Proceeding through Lytton Yard, the crew experienced an acceleration followed by a deceleration as a train-initiated emergency brake application occurred. The lead locomotive recorded the undesired emergency brake application at 2207:21.
The lead locomotive came to rest on the bridge over the river at Mile 98.0 at 2207:51 after travelling about 600 feet while in emergency. The tail end of the train stopped 480 feet after going into emergency. After performing the necessary emergency procedures, the crew discovered derailed cars on, and to the west of, the bridge over the Thompson River.
Weather
The weather at the time of the derailment was mainly clear and the temperature was about 17°C.
Occurrence site information
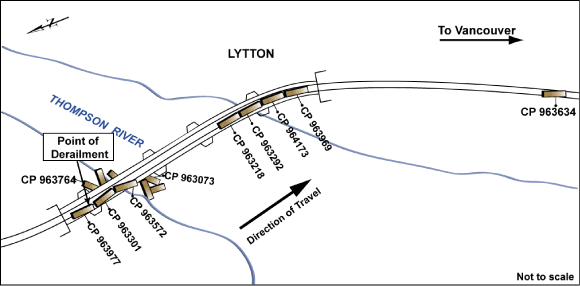
Twenty loaded hopper cars derailed in positions 77 to 96 behind the lead locomotive (see Figure 2). From the west to the east, the 77th car had its "B" end truck derailed approximately 15 car lengths west of the bridge. The next four cars (the 78th to 81st) had derailed upright at the west end of the bridge on spans four and five. The bridge consists of five spans numbered from east to west. Two cars, the 94th and 95th, had derailed and fallen into the steel structure of span 2. The 96th car "A" end truck had derailed and was upright on the east end of the bridge on span 1. Between the derailed cars at the east and west ends of the bridge, 12 cars (the 82nd to 93rd) had derailed and fallen off the bridge, 6 landing between the bridge pier and the east embankment and 6 landing in the river.
Approximately 1400 tons of coal spilled into the river and 40 more tons were lost during wrecking operations. About 80 tons that had hung up on the river embankment were recovered.
The rail, fastenings, and guard rails across the bridge, as well as 280 concrete ties, pads, insulators, and clips, and two sets of Conley rail expansion joints (four in total) were damaged or destroyed. A fibre-optic cable was severed by the derailed cars, disrupting CN radio, wayside inspection systems, and centralized traffic control communications for more than 30 hours. Service for other communication customers on the cable was immediately redirected to fallback protection circuits.
The derailment caused extensive damage to the deck on span 2, requiring replacement of all 97 ties. Portions of the deck on spans 3, 4, and 5 were also damaged, requiring replacement of some ties. There was extensive structural damage to the bridge on span 2. There was lesser damage to span 3.
All rail traffic was diverted around the accident site on CPR track while extensive track and bridge component repair and replacement was done. Service was restored at 1100 on Sunday 06 August 2006.
Rail pieces recovered
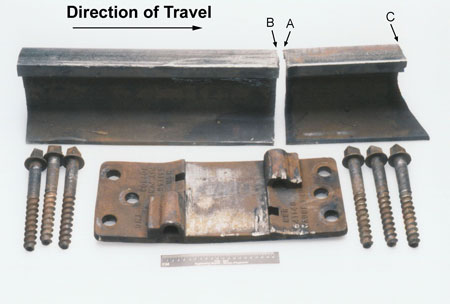
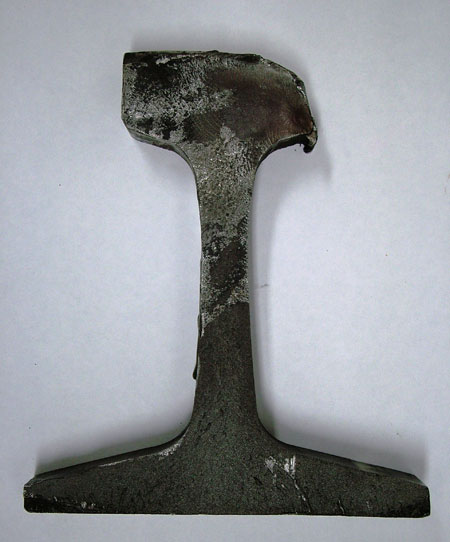
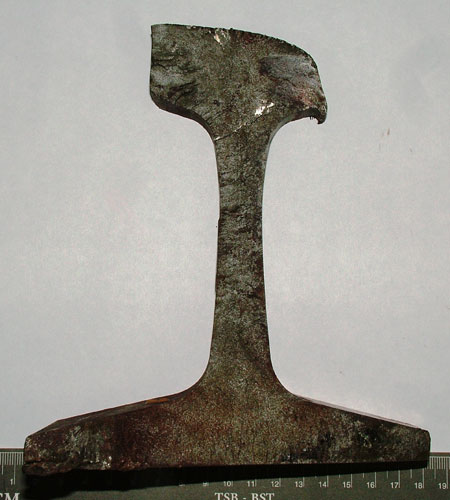
The point of derailment was determined to be at a broken rail on a tie plate located approximately 67 feet, 4 inches west of the east abutment on the north (high) rail in the entry spiral of the eight-degree left-hand curve on the east end of the bridge. Two weeks later, another nine-inch-long piece of rail was found on the concrete pier directly below where the broken rail was found on the bridge. The two pieces of rail are shown in Photo 1 displaying fracture faces A, B, and C. The small rail piece with fracture faces A and C was ejected off the bridge deck. The rail with fracture face B remained on the bridge deck where it was struck by derailing rolling stock.
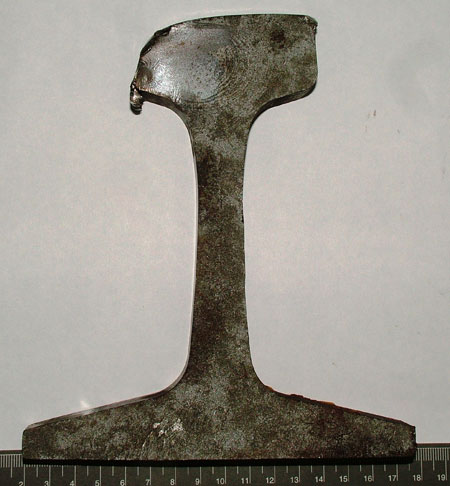
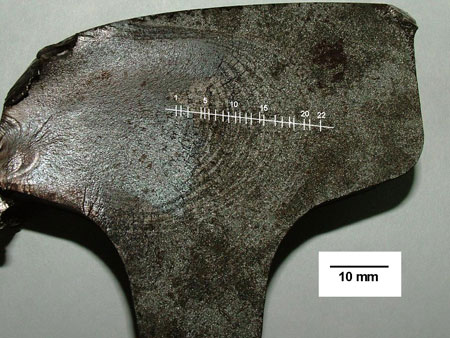
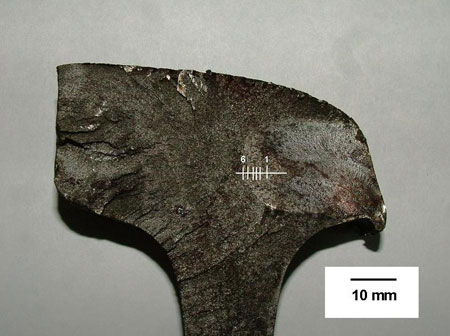
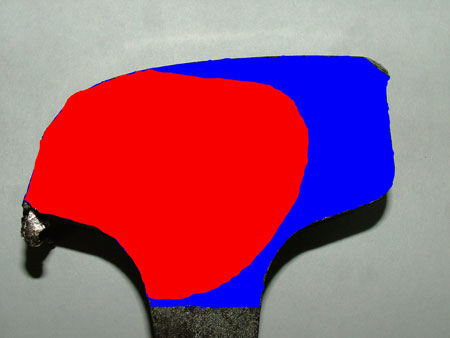
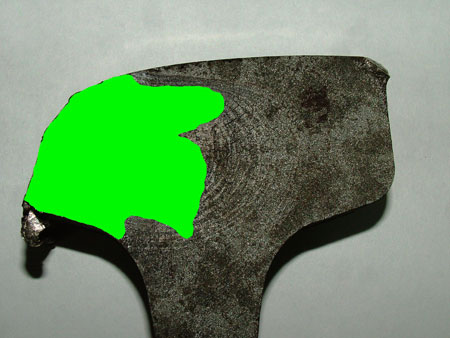
Fracture faces A and B matched and contained a progressive transverse fracture originating from the lower gauge corner that had propagated through a significant part of the head before it spread to the web (see Photos 2a, 2b, and 3). A significant portion of fracture face B was damaged by rubbing and impact damage was observed on the gauge corner. No corresponding rubbing damage was observed on fracture face A. Fracture face C on the east end of the smaller piece of rail also contained a progressive transverse fracture (see Photos 4a and 4b) that had propagated at an angle through the rail web and base. Beach marksFootnote 2 can be seen on fracture faces A and C marking the progression of the fracture.
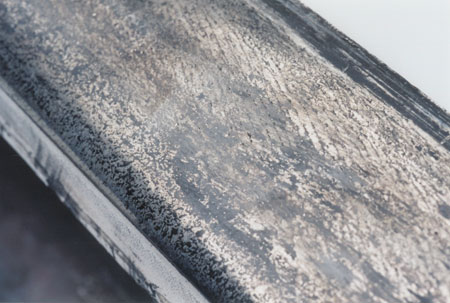
A visual inspection of the surface of the rail pieces showed fine head checking,Footnote 3 some minor spalling,Footnote 4 but no visible evidence of shellingFootnote 5 or corrugation (see Photo 5). Minimal lubrication was observed on the top and flange of the rail.
Sperry and CN also visually examined the pieces of rail at the accident site on 05 August 2006. A reverse detail fracture type of defect on fracture face A, originating from the vicinity of a cold rolled lip condition at the lower gauge corner of the rail head, was observed.
Both pieces of the high rail, the tie plate, six lag screws, and the supporting tie were sent to the TSB Engineering Laboratory for further examination.
TSB Engineering Laboratory report LP 075/2006
Following chemical analysis, image analysis, tensile testing, hardness, and microstructure examination of the two rail pieces, the following observations were made:
- The rail sections submitted for examination showed two detail fractures from shelling.
- The rail material met the chemical composition, microstructure, macro- and micro-cleanliness, Brinell hardness, and ultimate tensile strength requirements of CN specification 12-16C June 2001 for high performance rail. The elongation of the rail material was within the 6 to 12 per cent range for typical rail materials.
- On fracture face A, 70 per cent of the head cross-sectional area had failed due to fatigue (see Photo 6) and 34 per cent of the head cross-sectional area was burnished (see Photo 7). On fracture face C, 21 per cent of the head cross-sectional area had failed due to fatigue while 15 per cent of the head cross-sectional area was burnished (see Table 1). The size of the fatigue cracks and burnishing indicate that the defects were present for some time in the rail before the occurrence. The two defects were classified as large and medium as per the classification scheme described in the CN Rail Defect Reference Manual.
| Fracture | Percentage of head cross-sectional area with fatigue crack | Percentage of head cross-sectional area with burnished fatigue crack | Number of beach marks observed on fracture surface | Beach mark spacing (mm) | |
|---|---|---|---|---|---|
| Average | Standard Deviation | ||||
| A | 70 | 34 | 22 | 1.08 | 0.45 |
| C | 21 | 15 | 6 | 0.88 | 0.35 |
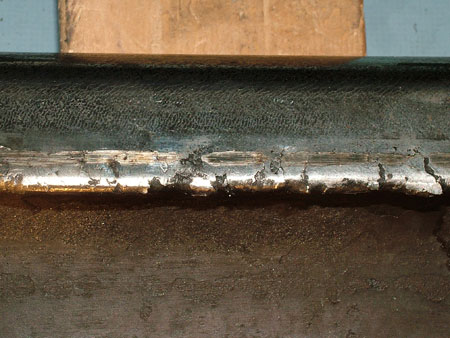
- Scuffing and tearing indicative of extreme loading were observed on the gauge side of the rail pieces (see Photo 8). In addition, heavily deformed pearlite grains and surface patches of martensite were observed on the gauge side. These observations are consistent with a rail loading condition conducive to the formation of subsurface shells that subsequently led to the initiation of transverse fatigue cracks.
Fractographic observations suggest that the fatigue cracks grew from small to large defects relatively quickly. In general, the rate of fatigue crack propagation accelerates as the crack increases in size and the remaining rail head cross-sectional area decreases.
Examination of the bridge timber tie under the rail break, the tie plate, and lag screws revealed the following:
- The bridge timber tie fragment was clear of imperfections or decay that might have adversely affected its strength and it is likely that the bridge tie failed as a result of impact with derailed rolling stock.
- The microstructure and hardness of the tie plate material were in agreement with the requirements of the applicable American Society for Testing and Materials specification. The surfaces of the screw holes showed normal wear and the lag screws were in good condition without ovaling or rubbing, indicating that the tie plate was securely fastened to the bridge. The damage observed on the tie plate and bridge timber fragment recovered from the derailment site was consistent with impact damage caused by derailed rolling stock.
Directional running zone
CN and CPR operate parallel transcontinental routes through the Thompson/Fraser River canyons between Kamloops and Vancouver. The two railways entered into a bi-directional running agreement in 1999 through this high-traffic corridor. Under the agreement, loaded CN and CPR trains travel westward on CN track, taking advantage of the flatter grades while lighter, empty trains travel eastward on CPR track. This arrangement increases network capacity and reduces locomotive power requirements for both railways. The directional running zone (DRZ) was fully implemented in mid-2001 and extends 156 miles on CN trackage from Coho, Mile 57.2, of the Ashcroft Subdivision to Matsqui Junction, Mile 87.9, of the Yale Subdivision. The majority of traffic through the DRZ consists of freight trains. However, VIA Rail Canada Inc. (VIA) passenger trains operate once daily, six days per week, and a tourist train operates once daily, six days per week, between April and October. The total tonnage carried in 2005 was approximately 96 million gross tons (MGT), of which 25 per cent was 286K (286 000 pounds) axle loading.Footnote 6 This is approximately double the amount of tonnage carried on the Ashcroft Subdivision before the implementation of the DRZ. Approximately 50 per cent of the tonnage was bulk commodity unit train traffic.
Particulars of the track
East of the derailment site, the track passes through mountainous terrain along the north bank of the Thompson River. At Mile 97.4, the track crosses over the river on a 615-foot-long open deck steel bridge built in 1913 for the Canadian Northern Railway. Track alignment across the bridge is an eight-degree left-hand curve at the east end of the bridge (Mile 97.21 to Mile 97.37) reversing to an eight-degree right-hand curve at the west end (Mile 97.38 to Mile 97.51) on a level gradient. Superelevation on the eight-degree left-hand curve is approximately 3.5 inches, which is balancedFootnote 7 for the 25 mph speed permitted over the bridge.
The bridge consists of five spans: a deck plate girder approach span at either end with three deck truss spans on concrete piers across the river. The bridge is approximately 75 feet above the Thompson River. The guard rails were 115-pound jointed rail joined with six-hole splice bars and spiked every second tie. They were installed 14 inches from the south rail and 11.5 inches from the north rail. A distance of 11 inches is specified in CN's standard plan TS-1108, Typical Guard Rail Installation, for open deck bridges with bridge plates.
The high rail in the eight-degree left-hand curve at the east end of the bridge consisted of 141-pound continuous welded Nippon head-hardened rail rolled in October 2001 and installed in July 2002. Measurement of the rail showed 12 mm of head wear and 6 mm of flange wear. The low rail was 136-pound Sydney and Nippon head-hardened rail rolled in 1995 and 2000 with 17 mm of head wear and no flange wear. Neither rail exceeded the specified limits for wear loss. The rail was not anchored on the bridge; rail expansion and contraction was accommodated by two sets (four in total) of Conley jointsFootnote 8 located back-to-back between the two reversing curves.
The open deck bridge deck consisted of 425 timber ties of three different sizes: 10 inches by 18 inches, 14 inches by 18 inches, and 14 inches by 22 inches, installed in 1998. The ties are tapered to create the required superelevation for the two eight-degree curves on the bridge. The north rail and sections of the south rail were secured on the open deck bridge ties with zero-restraint Pandrol "e" type elastic fastener clips and 7 ½ inches by 18 inches cast ductile iron plates, each fastened to the ties with six lag bolts, three on each side of the rail. Sections of the south rail were secured with Portec curve block fasteners and plates attached to the ties with eight lag bolts, four on each side of the rail. Off the bridge, rails were secured on concrete ties with conventional elastic fasteners. The ties and crushed rock ballast were in good condition.
The maximum permissible speed in the derailment area between Mile 97.2 and Mile 98.9 was 25 mph for freight trains and 35 mph for passenger trains.
Track inspections
The track through the derailment area is classified as Class 3 track by the Railway Track Safety Rules (TC E-04.2) approved by Transport Canada. The track carried more than 25 million gross tons of freight and passenger traffic during the preceding 12 months which requires a minimum visual inspection frequency of twice weekly and a track geometry car inspection frequency of twice per year. The track was visually inspected on 23 July 2006, 24 July 2006, and 25 July 2006. The last inspection before the derailment was done on 28 July 2006 by an assistant track maintenance supervisor riding in a hi-rail vehicle. No deficiencies were noted at the bridge following this inspection. A review of visual inspection records for the previous month revealed a deviation from the designated elevation on the bridge curves between spirals on 22 June 2006. This defect was repaired the same day.
The Ashcroft Subdivision was tested four times by a track geometry car in 2006 with two of those tests conducted before the derailment (on 24 April 2006 and 19 July 2006) and the other two after the derailment. Seven short priority tight and wide gauge defects were recorded on the 24 April 2006 test in the exit and entry spiral curves of the left-hand and right-hand curves on the bridge. The maximum value recorded was ¾ inch tight gauge over 26 feet in the exit spiral of the left-hand curve at the east end of the bridge. There was a two-foot-long, 1 ¾ inch warp62Footnote 9 priority defect recorded on the 19 July 2006 test in the entry spiral of the eight-degree right-hand curve on the west end of the bridge.
Rail testing
A Sperry rail flaw detection car tested the rail for internal defects on 06 January 2006, 04 February 2006, 14 March 2006,18 April 2006, 23 May 2006, and 29 June 2006. Four detail fractures (car code transverse detail defect (TDD)) were identified in the vicinity of the bridge between Mile 97.0 and Mile 98.0 on the January and April tests. A review of the June test tape showed that there was an equipment response indication approximately 72 feet west of the east backwall of the bridge. This closely corresponds to the field measurement of 67 feet 4 inches for the location of the broken rail on the tie plate on the bridge. Although the depth location of the test equipment response suggested that a possible defect was present within the rail section, the operator attributed it to the presence of a thermite weld upset/finishFootnote 10 based on similar equipment responses in the immediate vicinity. These responses are present at an equivalent depth location in the test data display as that associated with a transverse-oriented defect and no further action was taken by the Sperry operator.
The 29 June 2006 test was performed using the Sperry hi-rail testing vehicle SRS 963. This unit had both ultrasonic and induction-testing capability (see Appendix A). The operator conducting the test was providing vacation relief and was not normally assigned to SRS 963. He was experienced and had received on-the-job training in system maintenance, ultrasonics, and data interpretation.
The TSR require that Class 3 track be inspected for internal rail defects at least once per year. According to CN's Standard Practice Circular (SPC) 3207, Rail Testing Frequency and Remedial Action for Defective Rails, the Ashcroft Subdivision Class 3 track with 95 MGT requires six tests per year. Prior to directional running, it was tested six to seven times annually. Immediately after implementation of the DRZ, testing was increased to nine times annually and the track is currently being tested 12 to 13 times per year. Rail through the derailment area was tested six times between 01 January 2006 and the time of the derailment in July 2006. The frequency of rail flaw inspection exceeded the requirements of both SPC 3207 and the TSR.
A review of the rail flaw detection records indicated that there were 16 defects detected between Mile 97.0 and Mile 98.0 from 2001 to 2005 including 11 detail fractures, 2 transverse fissures, 2 defective plant welds, and 1 ordinary break. One of the TDDs was at Mile 97.21. All rails with previously detected defects had been replaced and there were no known defects in the curve at the time of the derailment. The next ultrasonic test for the Ashcroft Subdivision was scheduled for mid-August, 7 to 10 days after the derailment.
Rail maintenance
The rail head may be ground periodically as a maintenance procedure to control surface damage on the rail such as corrugations, head checking, and spalling. In addition, rail grinding can be used to influence the contact geometry between the wheel and the rail by restoring the correct head profile, moving the wheel/rail contact position across the head in order to relieve contact stress, thus preventing the initiation of deep-seated shell defects such as detail fracturesFootnote 11 at the upper gauge corner and extending the life of the rail. Rail grinding gradually increases the depth of compressive residual stresses into the rail subsurface and retards the initiation and growth of small, deep-seated shell defects. CN considers rail grinding to be the primary defence against internal defect initiation and propagation.
The Ashcroft Subdivision is ground four times per year at approximately 25 MGT intervals. The rail on the bridge was ground on 29 January 2006 and 08 May 2006. For preventive grinding, curves greater than three degrees should be ground every 15 to 25 MGT.Footnote 12 CN SPC 3709, Rail Grinding with Self-Propelled Grinding Machines, states that the grinding profiles and frequency will be as specified by the chief engineer.
Although rail grinding stones have been adjusted to grind lower down on the gauge face, rail grinders currently do not grind much below 60 degrees from horizontal. To grind off the lip on the lower gauge corner would require modifying grinding motors to almost 90 degrees. This is not practical as the grinding stones would come in contact with in-track obstructions such as joint bars, crossings, switches, and dragging equipment detectors. The stone angles on the CN RG 316 (Loram) grinder do not grind the gauge face below 40 degrees. In comparison, CPR's maximum gauge-grinding angle was 45 degrees before it developed new grinder patterns by offsetting grinding motors to increase grinding effort between 30 and 60+ degrees on the high rail gauge face in response to an increase in deep-seated shell defects on high-tonnage lines in British Columbia in 2004.
The Conley joints on the bridge were welded and ground in September 2005. Gauging and de-stressing were performed in April and May 2006.
Friction management is the process of controlling the frictional properties of the rail/wheel contact on both the wheel flange and the top of the rail to reduce wheel and rail wear, contact stresses, lateral forces, and rolling resistance in both curved and tangent track. An added benefit is reduced fuel consumption.
CN's lubrication program uses wayside flange and top-of-rail lubricator systems in the DRZ on the Ashcroft Subdivision. There are 11 DC solar or AC electric lubricators (four flange and seven top-of-rail) between Mile 88.94 and Mile 104.27. The flange lubricators nearest to Mile 97.4 are at Mile 94.7 and Mile 99.1 and the nearest top-of-rail lubricators are at Mile 95.31 and Mile 97.98. The lubricators use non-contact, rail-mounted sensors that detect the passing of wheels to signal the electric motor to dispense lubricant. Control box settings can be adjusted to regulate the volume of lubricant dispensed based on the number of wheels travelling through the site, minimizing lubricant waste and the potential for wheel slips and train stalls. These types of lubricators use modern technology that requires less maintenance than older mechanical models.
Lubricant performance (as characterized by migration and retention on the rail) can vary widely depending on the climate, track characteristics, traffic type, operating patterns, dispensing equipment, type of lubricant, and lubricator maintenance practices. Optimal positioning of lubricators is required. CN SPC 3206, Rail Lubrication, contains a lubricator placement model that specifies the coverage for a single wayside installation based on degree and length of spiral and circular curves for the area to be covered. In comparison, CPR uses a formula that also considers types of lubricants and applicator bars, direction of traffic, wheel bases of locomotives, axle loads, speed, misaligned and self-steering trucks, and train braking. Guidelines on lubricator installation and maintenance are also provided in SPC 3206. Although a CN mechanic repairs and fills the lubricators as needed on a monthly basis, the monitoring of lubrication effectiveness by measurement of coefficients of friction at the wheel/rail interface is not performed, nor is the practice discussed in SPC 3206.
Neither grinding nor lubrication alone is enough to properly manage the wheel/rail interface and the benefits of a combined rail grinding and friction management program have been recognized and widely accepted. A preventive grinding program, gauge face lubrication, and top-of-rail friction management work together to increase rail life.Footnote 13
Detail fractures
A number of serious rail accidents have been attributed to rail fractures resulting from rolling-contact fatigue defects (for example, spalling, shelling, and head checks), particularly in curves. As rail wears, non-conformal wheel/rail contact geometry (such as a wheel flange in contact with a rail head) and sliding friction create stresses that cause rail surface plastic flow (creep) on the gauge side on the high rail and field side on the low rail. Plastic flow on the high rail can lead to gauge corner collapse that yields deep-seated shells or internal inclusions that act as nuclei for various types of defect growth including transverse defects such as detail fractures.
A detail fracture is a defect classed within a group of fatigue defects known as transverse defects, which indicates that the plane of the crack is perpendicular to the running direction of the rail. A detail fracture is a progressive fracture of the rail starting from a longitudinal separation close to the running surface, or from shelling usually starting at the upper gauge corner and spreading transversely through the head.
Shelling (a longitudinal or horizontal crack) is a fatigue defect caused by the stresses generated by the passage of wheels. Once initiated, shells can grow for some length. Transverse cracks can split or branch from the longitudinal shell and grow vertically to form detailed fractures. The vast majority of shells do not turn into detail fractures. The mechanism by which shells branch and start to grow in a transverse direction is unknown.
Commonly known as a "detail fracture from shelling," positive identification of the defect cannot be made until the rail is broken because the longitudinal separation or seam in a detail fracture is not often exposed. Failure frequently occurs before the defect becomes visible and generally results in a complete break of the rail.
CN SPC 3207 and the TSR have identical instructions on the remedial action for rails with detail fractures. Depending on the size of the defect, slow orders or joint bars can be applied and operating speeds reduced.
Detail fracture growth rate
Research work has been done to develop models for the growth rate of detail fractures. The results of this work can be used to establish rail testing intervals. A defect that is very small will probably not be detected and if the interval to the next test is too long, the defect may grow to the point of failure. The results of this work indicate that the number of detail fractures increases exponentially in relation to tonnage carried. There were 1402 trains reported on the Ashcroft Subdivision between the 29 June 2006 ultrasonic test and the derailment on 31 July 2006. Defect growth from initiation to 10 per cent of the rail cross-sectional head area occurs relatively slowly but increases after 10 per cent. Growth rate from 10 per cent to 80 per cent cross-sectional head area can be reasonably represented by a straight line.Footnote 14,Footnote 15
For the broken rail in this occurrence, rings or beach marks that indicate the progressive growth of the detail fracture with each fatigue cycle in fracture face A, B, and C are shown in Photos 2a, 2b, 3, 4a, and 4b. As the size of the detail fracture increases, less of the head area is available to support the load. The critical size is reached when the remaining head area can no longer support the load and a sudden and complete failure of the rail occurs.
Based on its analysis, Sperry determined that the initial growth pattern of the Lytton detail fracture was approximately 3 per cent normal to 10 per cent sudden. Subsequent growth of the flaw progressed to 25 per cent normal, then to 60 per cent sudden, prior to complete failure of the rail section.
Detection of detail fracture fefects
Detail fractures are a common defect and one of the most dangerous because the only method to find them before failure is ultrasonic inspection of the rail. In Canada, on CN lines with CWR in the years 2003-2005, 22 per cent of all defects found by ultrasonic inspection were detail fractures. A review of TSB records between 2003 and 2006 shows that there were four main-track derailments where the TSB determined the cause to be rail failure due to detail fractures. There were an additional five derailments (not formally investigated by the TSB) where the owner railway determined the cause to be rail failure due to detail fractures.Footnote 16 Typically in these incidents, the rail testing frequency met or exceeded the minimum requirements.
On 03 August 2005, a major CN derailment occurred at Mile 49.4 of the Edson Subdivision (TSB report R05E0059). Forty-three cars derailed, including 25 tank cars containing Bunker C oil that spilled their contents, causing extensive property and environmental damage. The TSB investigation determined that the derailment was caused by a broken rail from a detail fracture. The subdivision had been repeatedly tested before the derailment but no defects were found.
Examination of rolling stock
The train had received a certified safety and maintenance car inspection by CPR at Golden, British Columbia, Mile 36.7 of the Mountain Subdivision, on 29 July 2006.
As the train operates with the "A" end leading on all cars, the right side of the train would have passed over the rail that broke. Post-accident examination of the wheels of the 76th car (CP 963118) revealed an impact mark on the R1 wheel flange and the R2 wheel had a mark on the gauge-side wheel flange but the car did not derail, indicating that the wheels travelled over the broken rail without derailing. The 77th car (CP 963634) had a small impact mark on the gauge side of the R3 wheel flange and a mark on the top of the R4 wheel flange. Both R1 and R2 wheel flanges exhibited impact marks. The "B" end of car CP 963634 was derailed and it was concluded that this car was the first car to derail after the rail broke under the preceding 76th car. A post-derailment inspection of the train did not reveal any pre-derailment defects that would have caused the train to derail.
The train had travelled over a hot box detector at Mile 80.8 and Mile 71.1 of the Ashcroft Subdivision. No defects were detected.
The train had passed over the CPR wheel impact load detector (WILD) site near Golden, Mile 47.8 of the Mountain Subdivision, on 13 May 2006, 14 May 2006, and 30 July 2006. The cars that did not derail continued westward to Vancouver and passed over the CN WILD site at Arnold, British Columbia, Mile 74.6 of the Yale Subdivision, on 04 August 2006. Two cars, with wheels that would have travelled over the rail defect, had non-condemnable impact readings as shown in Table 2 below.
| Car | Wheel | CPR May (kips) |
CPR July 30 (kips) |
CN August 4 (kips) |
|---|---|---|---|---|
| LUSX 4789 | R2 | 72.3 (May 13) | 72.4 | 61.1 |
| CP 963883 | R3 | 71.7 (May 14) | 77.7 | 75.8 |
No two WILD sites will read exactly the same for two cars because readings are dependent on train speed, substructure under the detector, and sensitivity of equipment.
None of the CPR or CN WILD readings on either the derailed train or the two preceding trains exceeded CPR's set-off and bad order criteria of 140 kips measured impact, 170 kips calculated impact, or CN's WILD criteria policy.
The second wheel set from car LUSX 4789 and the third wheel set from car CP 963883 were sent to the TSB Engineering Laboratory for analysis and it was determined that the condition of the two wheel sets was within acceptable limits for wear, shelling, and out-of-round. WILD readings at the last check point produced impact load values that were not sufficient to warrant their immediate removal from service.
DRZ risk assessment
CN anticipated the increased wear and infrastructure maintenance that would result from increased loading over the DRZ. A detailed engineering and operations review was conducted and risk reduction strategies developed before the implementation of the DRZ bi-directional agreement between CN and CPR. CN did not conduct a formal risk assessment under the Safety Management System Regulations because this requirement came into effect on 31 March 2001 whereas the planning for the DRZ occurred during late 1999 and throughout 2000.
Tie programs were done and all rail (tangent and curves) in the DRZ was relaid with head-hardened rail, as the tonnage effects had accumulated. Prior to directional running, the Ashcroft Subdivision rail was ultrasonically tested six to seven times annually. Immediately after implementation of the DRZ, testing was increased to nine times annually and is currently done 12 to 13 times per year. Rail grinding intervals of approximately 20 to 25 MGT had been maintained, effectively doubling the grinding effort on the DRZ. Concrete ties on high-degree curves that show rail seat degradation were replaced rather than repaired. New concrete ties incorporate a steel plate in the rail seat to extend tie life.
Analysis
Neither the condition of the rolling stock nor the manner in which the train was operated was considered contributory to this accident. Defects were observed in rail fragments recovered from the derailment site; therefore, the analysis will focus on the rail defects, maintenance, inspection, and testing practices.
The recovered pieces of rail had pre-existing fatigue defects identified as TDD on the fracture surfaces. Once initiated, the detail fracture continued to grow with the passage of trains. As the defect grew larger, the ability of the rail to withstand the wheel loads decreased. The train derailed when the defect ultimately grew to critical size and broke under the train.
The initiating point for TDDs is normally at the upper gauge corner of the high rail but they can develop anywhere on the gauge face of the rail. It is within this high-pressure, high-stress contact area where gauge corner collapse, plastic flow, shelling, and the development of transverse defects occur. Frictional curving forces increase a freight car truck assembly's tendency to steer towards the outside of the curve. This skews the truck causing the wheel flange on the high side of the leading axle to contact the rail at an angle known as the angle of attack, creating high wheel/rail contact stresses and lateral loads, especially in high-degree curves. The lower gauge corner metal flow as well as the smooth, shiny, yet heavily scuffed and torn condition of the high rail flange are clear indications of wheel/rail contact overstress. The overstress resulted in the formation of a shell at the lower gauge corner at a lip created by plastic metal flow. With the continued passage of rail cars, a detail fracture defect developed from the shell and grew transversely into the rail head.
Heavy axle traffic has doubled on the Ashcroft Subdivision since implementation of the DRZ in 2001 when loaded CPR trains began travelling westbound on CN track through the Thompson/Fraser River corridor. The adverse effects of this additional traffic are mitigated somewhat by the fact that a large part of the CPR coal fleet is outfitted with frame bracing and bearing adapter shear pads that permit the axles to align themselves radially to curves up to roughly five degrees, assuming the wheel and rail profiles can provide adequate rolling radius differences.Footnote 17
The reduction of wheel/rail contact stresses is essential for reducing the potential development of TDDs. This can be done by using premium track components, adjusting track geometry, grinding, and lubricating the rail. The 141-pound high-performance rail is a high carbon steel (0.85 to 0.95 per cent) that provides increased hardness and improved resistance to wear and damage. Conversely, this type of steel can be more susceptible to cleavage fracture and the development of shells and TDDs. Rails have been subject to increased gross rail loads in recent years and this type of rail was developed to offset wear and other types of failure that limit rail life. The high hardness of the surface of rails is achieved by head-hardening heat treatments.
The derailment curve was relatively sharp at eight degrees, but it was properly elevated for the speed of the train and therefore its design is not considered a factor in the development of the TDD. With fixed track alignment and balanced superelevation on the curve over the bridge at Mile 97.4, grinding and lubricating the rail are the only rail maintenance strategies available to reduce rail wear, metal flow, and the development of defects, thereby avoiding premature rail failure.
Rail head plastic deformation associated with passing wheel loads work-hardens the running surface and subsurface metal between grinding cycles and must be controlled to reduce potential TDD growth. Plastic flow near the top of the rail head is worn off by passing wheels or readily ground off with today's production rail grinders, but metal in the lower gauge corner is not. Although CN's grinding programs are significant and there have been improvements to rail grinding machines, it is beyond the capability of today's machines to remove metal flow to prevent the development and growth of detail fracture defects in the lower gauge corner of the rail head.
The number and type of rail lubricators in the area should have provided adequate lubrication if positioned and maintained in accordance with CN SPC 3206. Although lubricators are inspected and filled monthly, the poor condition of the high rail gauge face is a clear sign of inadequate and/or ineffective wheel/rail friction management. Lubrication effectiveness is monitored solely by visual inspection of the rail contact surface, is subjective, and provides only a qualitative assessment of lubrication effectiveness. Had CN measured the actual coefficient of friction on the rail contact surface, in addition to its visual inspections, this would have provided a quantitative basis on which to assess lubricator performance and friction management. The lubricator inspection and maintenance regime, along with the variability of lubricator performance and lack of friction measurement, did not ensure an effective lubrication program. Consequently, surface metal flow developed and contributed to the crack propagation, rail spalling, and the development of transverse defects.
Rail testing
Detail fractures grow beneath the rail surface and can only be detected by ultrasonic inspection. The TSB Engineering Laboratory analysis of the rail pieces concluded that the size of the fatigue cracks, fatigue striations, beach marks, and burnishing indicated that the defects had been present for some time in the rail before the occurrence. They may have been present at the time of the 23 May 2006 ultrasonic test, but their small size, orientation, or the presence of the shell prevented their detection. Review of the 29 June 2006 ultrasonic test tape, the last test performed before the derailment, showed that there was an equipment response indication near the location on the bridge where the rail broke on 31 July 2006. Although the depth location of the test equipment response suggested that a possible defect was present within the rail section, the indication was attributed to the presence of thermite weld upset/finish based on similar equipment responses in the immediate vicinity. These responses are present at an equivalent depth location in the test data display as that associated with a transverse-oriented defect.
The issue of shells or other factors masking the presence of detail fractures is recognized by the railways and the research community. Research on this issue has been performed by the Transportation Technology Center, a subsidiary of the Association of American Railroads (AAR). In 2003, the AAR published a reportFootnote 18 describing the results of work done predicting the response from ultrasonic signals reflecting back from detail fractures and shells. The results clearly identified limitations in the current inspection technology. The study determined that shelling can mask or hide the presence of a detail fracture. The shell will reflect the ultrasonic signal, preventing the signal from reflecting off the detail fracture. In addition, the orientation of the detail fracture can lead to the ultrasonic signal being reflected away from the transducer, thus preventing detection of the defect. If left long enough, the defects can grow to a critical size and the rail will fail suddenly.
The pre-existing detail fracture grew to critical size despite frequent ultrasonic inspections due to the difficulty of detecting and identifying these types of defects and their rapid, unpredictable growth rate.
Ultrasonic inspection is the primary method used to detect internal rail defects and control the risk of rail failures. Over the years, improvements have been made in the field of rail testing, including operator training, additional probes positioned at different angles, and improvements to defect recognition software. It has proven to be a reliable and economical method to test rail. However, detection and proper identification of detail fractures cannot always be assured because of their orientation with the surface of the rail or their being masked by the shell crack above the detail fracture.
Research work on low-frequency eddy current, laser-based systems, and phased-array systems continues and it is expected that rail flaw detection technology will continue to improve (see Appendix A). Although recent advances in ultrasonic testing technology have further reduced the risk of broken rail derailments, the detection and identification of all detail fracture defects is not within the capacity of the systems currently in use.
Although a formal risk analysis was not conducted before the implementation of the DRZ, CN has taken measures to mitigate the effects of increased tonnage over the DRZ. In response to the increased tonnage, rail and tie renewal programs continue, ultrasonic testing frequency has increased, and rail grinding effort has effectively doubled.
Findings
Findings as to causes and contributing factors
- The train derailed when a pre-existing detail fracture defect grew to critical size leading to the rail breaking under the train.
- The detail fracture defect developed from a shell at the lower gauge corner at a lip created by plastic metal flow caused by wheel/rail contact overstress.
- The pre-existing detail fracture grew to critical size despite frequent ultrasonic inspections due to the difficulty of detecting and identifying these types of defects and their rapid, unpredictable growth rate.
- The lubricator inspection and maintenance regime, along with the variability of lubricator performance and lack of friction measurement, did not ensure an effective lubrication program, which contributed to the crack propagation, rail spalling, and the development of transverse defects.
Findings as to risk
- Although recent advances in ultrasonic testing technology have further reduced the risk of broken rail derailments, the detection and identification of all detail fracture defects is not within the capacity of the systems currently in use.
- Despite improvements to rail grinding machines, it is beyond the capability of today's machines to eliminate metal flow and prevent the development and growth of detail fracture defects at the lower gauge corner.
Other finding
- Although Canadian National (CN) did not conduct a formal safety management system risk assessment, CN anticipated the increased wear and infrastructure maintenance that would result from increased loading over the directional running zone (DRZ). A detailed engineering and operations review was conducted and risk reduction strategies developed before the implementation of the DRZ bi-directional agreement between CN and Canadian Pacific Railway (CPR).
Safety action taken
In 2007, Sperry Rail Service introduced a new roller search unit wheel called the x-fire (crossfire) that is designed to improve the detection of defects under shells by providing increased sensitivity to the presence of detail fractures. Pattern recognition software is used to recognize, classify, and size track features. Advanced signal-processing technology filters out artefacts and assists operators in interpreting data and focusing on defects. This new technology allows for faster, more frequent and accurate testing as well as recognition of anomalies that are less likely to be misinterpreted as benign rail features. Currently, the x-fire wheel is deployed on seven of Sperry's 950 new vehicles.
Canadian National (CN) now requires that for all bridges crossing a roadway, crossing a navigable waterway, or over 100 feet long, maximum testing speed shall be 5 mph and every indication generated by the testing system must be acknowledged by an icon or a comment clarifying the operator's interpretation. In addition, all indications interpreted as a fillet or weld must be confirmed visually and all suspect indications must be hand-tested.
Although not causal, CN has initiated a program to remove Conley expansion joints from bridges in its British Columbia south line. Frame bracing will be added to the bridge which will allow anchoring of the continuous welded rail to the ties on the bridge and the elimination of Conley joints. Conley joints are costly to maintain and their elimination will reduce the transmission of impact forces into the bridge superstructure.
This report concludes the Transportation Safety Board's investigation into this occurrence. Consequently, the Board authorized the release of this report on .
Appendices
Appendix A – Rail testing
Sperry Rail Service performs all rail testing on Canadian National trackage under contract. The induction method of testing rail for internal defects involves creating a strong magnetic field in the rail by passing a large amount of low-voltage current through it. The presence of an internal defect changes the magnetic field and the defect indication is recorded on a strip chart. The induction method inspects mainly the rail head and although transverse fissures can be found, many other manufacturing and service-related defects and fatigue cracks below the rail head are undetectable.
Ultrasonic testing complements induction testing by using transducer-generated, high-frequency sound energy propagated through material in the form of waves. When there is a discontinuity such as a crack in the wave path, part of the energy is reflected back from the flaw surface. The reflected wave signal is transformed into an electrical signal by the transducer and is displayed on a screen. The reflected signal strength is displayed versus the time from signal generation to when an echo was received. Signal travel time can be directly related to the distance the signal travelled and accurate information about the reflector location, size, and orientation can immediately be gained. North American railways have been inspecting rails using the ultrasonic method since the first all-ultrasonic inspection car was introduced in 1959, and this is the most common method in use today.
The transducers are housed in fluid-filled wheels mounted in a roller search unit carriage which couple the transducers to the rail. A liquid couplant consisting of a thin film of water mixed with glycol or calcium facilitates the transmission of ultrasonic energy from the transducers into the rail. The transducers are set at different angles to achieve the best inspection coverage possible.
In Sperry's A-scan system, there are two wheels, each containing five transducers for a total of ten transducers or probes on each rail: two zero-degree or vertical-looking transducers, one forward-looking and one rear-looking transducer nominally aligned at 45 degrees (actually at 37 degrees), and six 70-degree transducers. The SRS 963 hi-rail testing vehicle uses the newer B-scan system which has two additional "side-looking" modified 70-degree transducers which look at each rail head at a lateral angle to detect vertical separations for a total of 12 transducers on each rail. These arrays of transducers result in a test of the entire rail cross-section with the exception of the outside base edges. Because the B-scan ultrasonic testing technology can test a greater volume of rail and detect smaller defects, flaw detection is improved by approximately 50 per cent.
The data from the inspection equipment are fed to the operator inside the car and visually presented on monitors. Six channels display the ultrasonic and induction signals and where the exceptions occur relative to track features such as joints and crossings. If the operator considers an indication suspect, the test vehicle is stopped and backs-up to the point of examination. The operator gets out and hand tests the rail with an ultrasonic test set mounted on the rear of the car. If a defect is confirmed, it is marked and a rail work crew following the Sperry Rail Service car changes the rail or otherwise protects it.
Research and development of new rail testing technologies, methods, and processes continues. In Association of American Railroads (AAR) report R-963, three different developments are discussed. The first is low-frequency eddy current. The work done to date indicates that the low-frequency eddy current system is capable of detecting transverse defects below shells. Future development is still required for this technology.
The second development is a phased-array technology which would substantially increase the number of probes from the current 12 commonly in use to 64 or 128 at various different angles. The limitation to this technology is the time required to process all the signals which limits testing to walking speed. As improvements to processing time are made, this technology will be more applicable.
The third development is a laser ultrasonic system that can transmit and receive signals without the transducers being in contact with the rail. This will reduce the time that lubricators need to be shut down for tests, enable better testing of the web and base of the rail, and permit the introduction of signals into the head at more angles and locations than can be done with the wheel probes.
